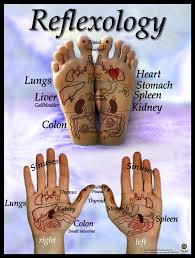
 REFLEKSIOLOGY KAKI DAN TANGAN
RM45 /45 MIN
REFLEKSIOLOGY TANGAN
RM30/ 30 MIN
REFLEKSIOLOGY KAKI
RM30/30 MIN
------------------------------------------------------------------------------------
Foot Reflexology techniques and step by step instructions
Foot reflexology technique - thumb walking
This is the most used technique for doing foot reflexology
It is easy, can be done for long periods of time without straining your hand
and is extremely effective on the feet
Your thumb walks forward by itself simply by you bending and unbending the thumb.
Step one, know which bit of the thumb to use
1 put your hands palm together in front of your face and look at the topsf your thumbs
2 roll thumbs together at the top slightly so the nails are just touching
3 feel the part of your thumbs where they are touching each other just on
the inside at the top onThis is the part of the thumb to use when thumb walking,
the inside edge of the very top of your thumbs, (edge meaning that it is furthes
away from the fingers of the same hand when the hand is put flat on a table)
Step two, the thumb walking reflexology technique
1 hold a pen with one hand (if you don't have a pen any similar surface is fine)
2 with the other hand, put your thumb on the pen touching it with the part of the thumb described in the first step
3 bend your thumb
4 without moving anything else, simply straighten your thumb making surethat it stays in contact with the pen
You will notice two things
- your thumb crept slightly forward
- you are now able to apply a little bit of pressure with the part of your thumbthat is touching the pen
5 repeat; Bend, unbend, bend, unbend
Apply pressure at the unbend and creep forward in the bend.Practice this technique slowly, it gets easier and faster with practice It is easy learning foot reflexology techniques, pratically anything is a great surface to practice on ; tables, chairs, TV remote controls... anything can be
thumb walked! This technique is used for the entire footThumb walking allows a reflexologist to apply stimulating pressure to every single part of the foot, giving a thorough and relaxing treatment
How to do reflexology on the feet step by step
Begin your foot reflexology session on the right foot, do the whole foot, then dothe left foot
Step one, relaxation exercises
1 massage the foot all over slowly but firmly to loosen it up
2 with both hands, hold on to the spine area with the palm of the hands- thefingers on the top
of the foot and the thumbs on the bottom of the foot.
3 slowly and gently twist/ wring the hands away from each other in order to gently twist the spine area on the foot. This is a relaxation exercise. Do this, twisting
both ways, for about ten to fifteen seconds each way
Step two, thumb walking up and down the spine
1 thumb walk up the spine from the bottom of the heel to the tip of the big toe
2 thumb walk down the spine from top of the tip of the big toe to the bottom of the heel
3 thumb walk down the spine, but across-ways- from right to left for theentire lenght of the inside of the foot,see diagram below

Step three, rotate the toes
1 hold the toe firmly at the base of the toe, gently move in circular motions so that
you are rotating and stretching the base joint that attaches the toe to the foot
2 hold the toe just above the second joint and again move the joint in a largecircular motion
3 rotate the very top joint on the toe (the big toe only has two joints)This foot reflexology step is great for relieving headaches as it relates to all ofthe bones in the skull, jaw... every bone in the headWhen learning how to do reflexology remember the bones protecting our brain are fused together but are also separate bones, rotating the toes sends extra blood flow to their joints
Step four
There are meridian points at the end of all the toes except the middle toeSee the diagram below for the exact points, they are easy to remember becausethey are pretty much under each toe nail!
1 support the toe and use one finger to apply pressure on the meridian point in a circular motion clockwise, then anti-clockwise, do each toe for ten seconds beginning with the big toe and finish with the little toe
Step five, thumb walk the toes
1 thumb walk the toes, applying gentle but firm pressure, begin with the big toe and
finish with the little toeSome people like lots of pressure when thumb walking their feet, most people will notbecause it will stop the reflexology from being relaxing, and its supposed to be relaxing Some peoples toes are extremely sensitive The amount of pressure you use with any
reflexology technique is relative to how much pressure the person is comfortable with, and so it
is relaxing for them (although do be firm, too soft and you will tickle them!)
If there is pain in someones foot, take a break from doing reflexology on them for a while
Step six, thumb walk the chest area
The chest area is the ball of the footSee exact area in foot reflexology diagram below
1 gently thumb walk over the entire chest area in the upwards direction, then
downwards and then on an angle
Step seven, softly thumb walk the top/ back of the foot
This is a very sensitive area for most people.
1 thumb walk from one side of the foot to the other side ie; from the toes tothe ankle,for the entire top of the foot
2 thumb walk from side to side- from right to left sides of the foot, for the entire top of the foot
Step eight, thumb walk the Liver/ Stomach area
The waistline is the thinnest part of the bottom of the foot and may be furtherup or down and is in a different spot for everyoneUse the diagram at step six to locate the waistline
1 thumb walk on an angle across the area between the chest area and abovethe waistline
2 thumb walk on the opposite angle back across the areaThis area contains the very important liver and stomach, depending on which foot you are working
Step nine, thumb walk the Intestinal area
Use the diagram at step six to locate the waistline on the bottom of the footThe large and small intestines are in this area
1 thumb walk on an angle across the area between the waistline and the pelvic area
2 thumb walk on the opposite angle back across the same areaFor extra foot reflexology, check out the reflexology foot chart and see the direction that food moves through the intestines, and thumb walk in the same direction, the directio is different for the left and the right feet
Step ten, thumb walk the pelvic area
Use the diagram at step six to locate the pelvic areaThis area relates to the Sciatic Nervwhich runs up both legs
1 thumb walk from left to right over this area, go all the way up either side of the heel
2 thumb walk the back of the heel
3 finish reflexology with a gentle relaxing massage of the foot for one minutemOnce all of these steps are done on the right foot, do them all on the left foot Once finished the left foot, get the person receiving foot reflexology a big glass of water Water is extremely important when doing reflexology because it allows the blood to get rid of waste, and if you are increasing circulation that is exactly what the blood will do, so drink heaps and heaps of water for the next 24 hours
 xxxxxxxxxxxxxxxxxxxxxxxxxxxxxxxxxxxxxxxxxxxxxxxxxxxxxxxxxxxxxx


Hand Reflexology techniques and step by step instructions
Hand reflexology is as effective as any other type of reflexology, but if you have thechoice to do foot reflexology, it's preferred because foot reflexes are closer to thesurface of the skin
Reflexology on the hand will give you the same results as doing it on any other partof the body, but the results will take a little longer to happen. We use hand reflexology mainly for do-it-yourself reflexology or to relieve symptoms such as headaches, constipation, shoulder aches.. and much much more
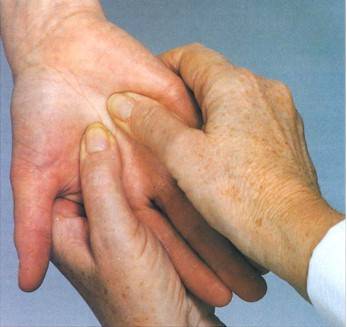
Hand reflexology uses a completely different technique than doing reflexology on the face or feet.. mainly because the hands are very flexible and the reflexes are much deeper under the skin which means you need to reach deeper and hold for longer to stimulate a hand reflexology point
Every reflexology treatment begins with a relaxation exercise. The relaxation exercise sets the tone of the treatment as relaxing and helps to soothe the muscles before you get into a therapeutic deeper massage of the reflexes. The best way to position yourself and the person set to receive reflexology, is to sit across a table from them with a towel under their hands/ wrists for comfort. Do all of the steps on the right hand and then all on the left hand.
When doing hand reflexology the relaxation treatment is a beautiful hand massage.
Hand Reflexology step by step instructions
- Step one, relaxation exercises
1 use a little massage or baby oil, and gently rub around the wrist of the right hand.Use big gentle sweeping movements of the thumbs.
2 move into the palms of the hands, working from the middle/ inside of the palm slowly to the edges. Repeat a few times.
3 turn the hand over, and very gently across the top of the hand, use your thumbs to push along from between the knuckles/ bottom of the fingers, to the wrist. This is very relaxing but using too much pressure can be painful.
4 holding one finger at a time, hold it as if to wring it right off the hand and give it a gentle side to side twist so that the knuckle bone joint is being rotated. Slide your hand up so that it does the same to the second joint on the finger and then the top finger joint. Do this to each finger
5 gently give the hand a last squeeze, pat off the oil with a towel, and do the same on the left hand.
- Step two, hand reflexology technique
Hand "reflexes", the spots we are trying to stimulate when doing reflexology, are very deep.
Much deeper than any other reflexology spot on the body. Hand reflexology technique is using one finger or thumb apply firm pressure in a circular motion over the same spot for about three to five seconds, then rotate in a circular motion the other way for about three seconds
- Step three, stimulating the meridians in the hand
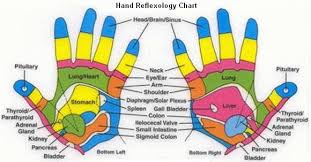
1 using the technique described above, use one thumb or finger apply pressurein a circular motion for three to five seconds clockwise and anti clockwise on each meridian point shown in the diagram below. The meridian points on the hands are:
- Lung Meridian
- Colon/ Large Intestine Meridian
- Heart Constrictor Meridian
- Triple Burner Meridian
This meridian is described by the ancient Chinese medical text the Nei Ching "thetriple burner is not exactly an organ, but a relationship between a number of organs.." It relates to the three main cavities of the body and the organs within. So is an essential meridian point to stimulate to promote regular balance within the whole body.
Heart
Small Intestine

- Step four, doing reflexology on the fingers
The fingers represent everything from your neck up. It represents the glands, brain, skull, facial skin, ears, hearing and sight...Toes represent the same areas. The difference between doing reflexology on the toesand fingers is that the fingers offer a greater area to do reflexology on. 1 using the hand reflexology technique all over the fingers, begin at the top of the thumb,
move downwards to the base of the thumb, give attention to every single bit from the inside to the outside. Do this to each finger.
- Step five, reflexology over the palm of the hand
For this step have the right hand laying flat palm face upwards. (do every step on the right hand then all of them on the left hand) The palm of the hand represents the body torso. Notice that the palm has different shades of colour, it generally is lighter in the middle and darker around the top and side edge
1 gently use the hand reflexology technique across the entire palm of the hand.
1a) Begin just under the knuckles and do the whole darker colour area.
1b) do the centre of the palm
1c) do the side, downwards from under the little finger to just above the hard boneon the wrist,
1d) do the same area on the side of the hand from top to bottom, but do the technique
moving across ways beginning on the outside of the hand and moving inward towards
the inside of the palm
1e) do the last area available, from the base of the thumb along the wrist to the wrist bone,
this is a very important area and relates to many things, including your spine and digestive system
2 turn the hand over so that it is palm faced down. Using the same technique work the
entire back of the hand (this is a sensitive area gently pressure is required), work down
from the knuckles to the wrist and around the wrist bone.
3 turn the hand palm face up, apply a small amount of massage oil and give a relaxing three or four minute massage.
4 give the person receiving reflexology a big glass of water
5 tell them to rest for the rest of the day and keep up the water Water is important because an increase in blood circulation means the body will get rid of waste quicker, but water is what the waste travels in, so make sure to have enough water to get rid of any excess body waste from the blood system to avoid 24 hours of flu like symptoms. Hand reflexology is great to do on other people but we think that it is the best one for doing reflexology to yourself and also is the best one for getting rid of headaches.
xxxxxxxxxxxxxxxxxxxxxxxxxxxxxxxxxxxxxxxxxxxxxxxxxxxxxxxxxxxx
REFLEKSIOLOGI MUKA
Face reflexology chart and step by step instructions
Face Reflexology is one of the most relaxing things to do and anyone can do it!Even as a do it yourself massage, face reflexology is brilliantThere are fifteen points on the face, spending about one minuteon each point means this nifty little session only takes about fifteen minutes to performSee the diagrams below, Begin at point number 1,and finish at point 15


